


I was carving a stump recently and thinking about all the little things I’ve learned in the last 18 years of carving trees.
I thought it might be meaningful to some of you. Here goes…
Tip #1 – Use a checklist
When preparing for a stump carving, I use a list that I’ve developed through the years to help me not forget to pack critical items. It’s easy to forget critical things when loading for a job and it can really slow down the workflow when it happens. Here is a link to the list I use. Stump Carving Gear list
Tip #2 – Tarps make easy cleanup
Laying tarps down around the base of the tree helps clean up go so much quicker. You can pull the sawdust away leaving a clean base. I don’t know about you, but the last thing I want to do after spending a week of intense carving on-site is to try to find a place to discard a ton of sawdust and wood chunks. So, I specify in my agreements with customers that they are responsible for clean up.

Tip #3 – Scaffolding saves time
Some may not want to take the time to set up scaffolding or may not want to pay to rent or buy them. In my experience, I find the hour that it takes to set up scaffolding, saves me a ton of time during the carving process because I have perfect, rapid 360 degree access to all parts of the carving. When carving from a boom lift, it’s cumbersome. When carving from ladders, it’s very limiting and just not safe. One job can pay for a set of scaffolding. Renting scaffolding is cheap too and worth every penny. Also, on shorter stacks, I don’t use x braces on the inside because it gets in the way – only outside x braces.

Tip #4 – Umbrellas
Lowes sells 9 ft. umbrellas that fit into scaffolding pipes. These are lifesavers on those hot summer days! They also work great during rainy days as supports that you can lay a tarp across.


Tip #5 – Simple Advertising
A simple banner can be hung on scaffolding with a few bungee cords as a great way to advertise when carving in public areas.

Tip #6 – Use a rope
On high scaffolding stacks it is necessary to use a rope to get all the gear up in a timely fashion.

Tip #7 – Before you start carving, choose the best position for your design in the log.
Walk around the log and look for the cleanest areas of wood where the face or other important areas will go. Pay special attention to knots. You don’t want them going through faces.
Look to see if the stump has a slight lean. If it does you will have to compensate for that in how you position your design, especially if you like to carve from the top down.
Pay attention to the center of the log, or the pith, and try to avoid the pith going through critical areas like faces. When possible, avoid the sapwood because of the sap as well as the staining and quality of the wood. This picture shows the line where sapwood meets heartwood. The second picture shows the center going through the wing instead of the body.


Tip #8 – Get your canvas ready
I’m using painting terminology to describe what it feels like when you shave the bark off of the log to reveal that clean, light-colored surface of the log.
If there is a big chunk of wood I know I have to remove, I’ll go ahead and remove it with the bark still on so I’m not wasting time debarking an area unnecessarily. A debarked log is very inspiring to me like a blank canvas.
The creative potential is always thrilling and excites me to start drawing on the log.

Tip #9 Keep your chains sharp as long as possible
I use my big bar saws to do all the initial blocking out cuts as well as debarking. Bark is primarily what dulls the chain, so I let my big saw chains take the abuse of the bark, then, when the bark is gone,
I move to my sharp carving bar saws. When debarking, the first cut has to go through the bark, but after that first cut, all the remaining debarking cuts should be pulling through the clean wood from the previous cut.
This will save the sharpness of your big saws. The other major chain destroyer is metal in the wood. I use a metal detector before I debark and when I see dark staining in the wood. Metal often leaves a dark stain up and down the grain, so you can detect when it’s hidden inside.

Tip #10 Wait until you see it
You’ve probably figured it out by now that carving is all about visualization. If I can’t see it in the log, I can’t carve it. Guessing where to cut usually leads to problems, so I wait until I see it. What helps me to see it, is to draw on the log with a lumber crayon. This allows me to see the cuts where they should and should NOT be so I can make the cuts with confidence. I use a grid system to transfer the design from paper to the surface of the log.
This grid process helps remove any guesswork so I can see clearly where the lines belong.

Tip #11 – Print out and display your reference images
I like to tape my printouts to a piece of cardboard and mount it on a tabletop easel. This way, the wind doesn’t affect it and I don’t have to keep picking it up to look at it.


Tip #12 – Carve the subject thicker.
This will give you some wiggle room with your cuts so if you cut too deep in some areas, you can shave it back. Then, you can refine it once the roughout is done.
Tip #13 Blow it off
Using a blower to clear away sawdust is such a time saver and brings you back to a clear visualization fast. The new battery-operated ones are great.

Tip #14 – Don’t worry about blemishes until the end.
If a blemish appears in the wood in a critical area like a face, don’t sweat it until it’s done. Many times, the blemish has been mostly removed after all the final refinements. Sometimes that doesn’t work and I have to replace some wood or change the design slightly to avoid a blemish. But most times, waiting until the end fixes it.
Tip #15 – Sometimes “add-ons” are necessary to make the design work.
Mating two flat surfaces with gorilla glue and screws works great. (Make sure you spray the glue with water to activate the foaming action.) I take the screws out once the glue is set and finish carving the add-on. When finished, I put the screws back in and fill the holes with wood or wood filler.


Tip #16 – Epoxy clay can save the day
Sometimes there will be holes or blemishes that need a quick, permanent fill. Epoxy clay/ putty works great for this. Larger cavities can be filled with expanding foam spray like Great Stuff and then surfaced with epoxy clay/putty. For holes or cavities on top that no one will see, Great Stuff surfaced with black roofing cement can also work well. Another fast filler I’ve used is Bondo autobody filler.

Tip #17 – Don’t leave bark on the base
Sometimes we are tired and don’t want our chains to get dull by the time we get to the bottom of the carving, so we are tempted to just leave a little bark showing on the bottom like this picture. This is a terrible mistake because the bark will attract bugs and moisture at the most critical part of the carving. If it starts to rot at the very bottom of the base, it’s very hard to save the carving. Leaving bark on will guarantee it to rot and do it rapidly.

Instead, you should carve the base to look like this if you want to preserve the carving as long as possible.

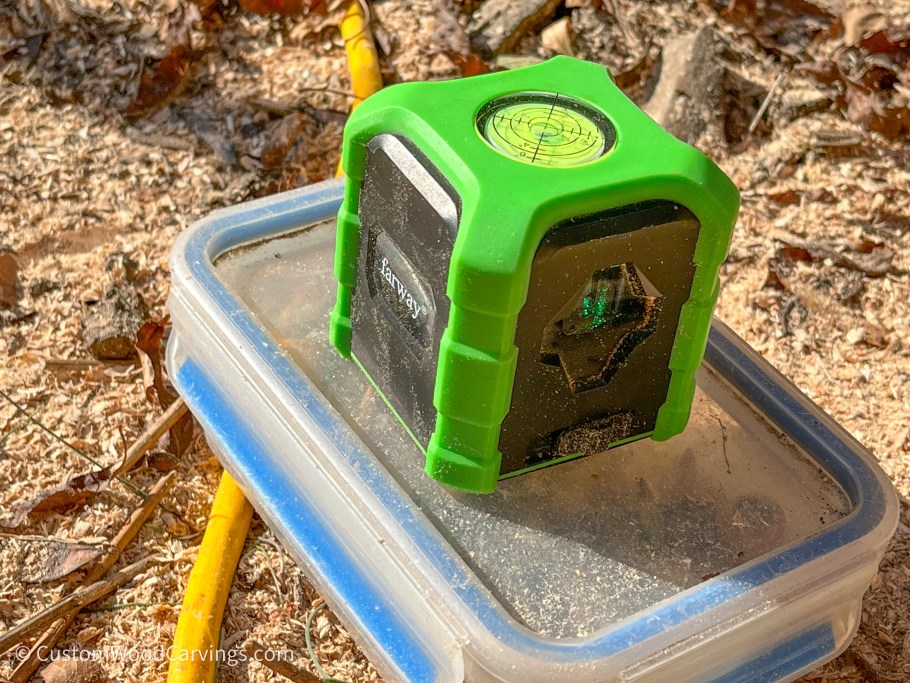
Tip #18 – Use a laser level
I use this laser level to help me draw a perfectly flat line all around the base when I’m finished carving. I use a lumber crayon to trace a level line all the way around the carving


Tip #19 – Cut all the way through at the bottom of the base
We can preserve the outside of the carving with a number of different wood preservatives, but what about the inside? The only thing we can do to prevent rot from the inside is to make a cut all the way through the very bottom of the base. This should only be done on carvings that are straight up and down and are not top-heavy. First, I use a laser level (as seen above) to draw a perfectly level line around the base, then I begin my cut. As I’m cutting through, I’ll slide in plastic shims in the cut so the tree doesn’t pinch my bar. When I’ve finished the cut, the tree is now sitting on plastic shims. I then slide a 3/8″ – 1/2″ thick metal flat bar in 3 or 4 places evenly in the cut around the tree. Next, I knock out the shims and leave the tree resting on the spacers. I add 6″ timber screws around the base as supplemental support. This process ensures that rot will not spread up the trunk through the earth.

Tip #20 – Carve in comfort and get this Powercap
The Powercap is worth every penny (Around $600). It allows you to carve and sand while seeing and breathing with so much comfort and ease. I’ve used this for the past 6 years on every carving and won’t carve without it. You can purchase them at PekeSafety

Tip #21 – Use written contracts and sketches/ photos
This ensures that you and the customer are on the same page visually and that all the expectations are clear. It should clearly spell out the design that you will be carving, the size, roughly how long you expect it to take, how you will finish it, the clean-up procedure and the money details (How much for a deposit and final balance, cash, check or card.) It should also say something about maintenance and cracks.

Tip #22 – Have the customer be responsible for clean up
Years ago, I spoke to a veteran carver about stump jobs and he told me to never do the cleanup. I was not sold on that idea because I thought “That seems like poor service”. But he was right. After you have traveled back and forth to an on-site carving day after day, climbed up and down scaffolding with all your gear, and pushed hard with long exhausting hours, you finally come to that moment of completion and you are tired and ready to go home. The last thing you want to do is move chunks of wood and sawdust to who knows where! Many times they don’t even have woods to throw them in, and you don’t have a wheelbarrow to move it with. It just simplifies things greatly to write that detail into the agreement so there are no surprises at the end of your hard-earned job.

Wow! You made it to the end! I will continue to add to this post as I think of other things. If you have ideas to add as well, please share them in the comments or via email. I hope this is a help to some of you. If you enjoy these types of posts, click the “follow” button! Happy carving! Follow Custom Sculpture & Sign Company on WordPress.com

[…] of the wooden trunk. One carve is horizontal to the ground, and the other carve is an angle on a flat carve and crosses the first cut. If you carve these two cuts correctly, it will join in about one-third […]
I printed this out a long time ago and still refer to it. You updated the photos? Nice
How long do you wait to start carving after the tree has been felled? What can I do to minimize the stump cracking as it dries?
Thats crazy good work, thats as good as it gets. Exceptional talent